



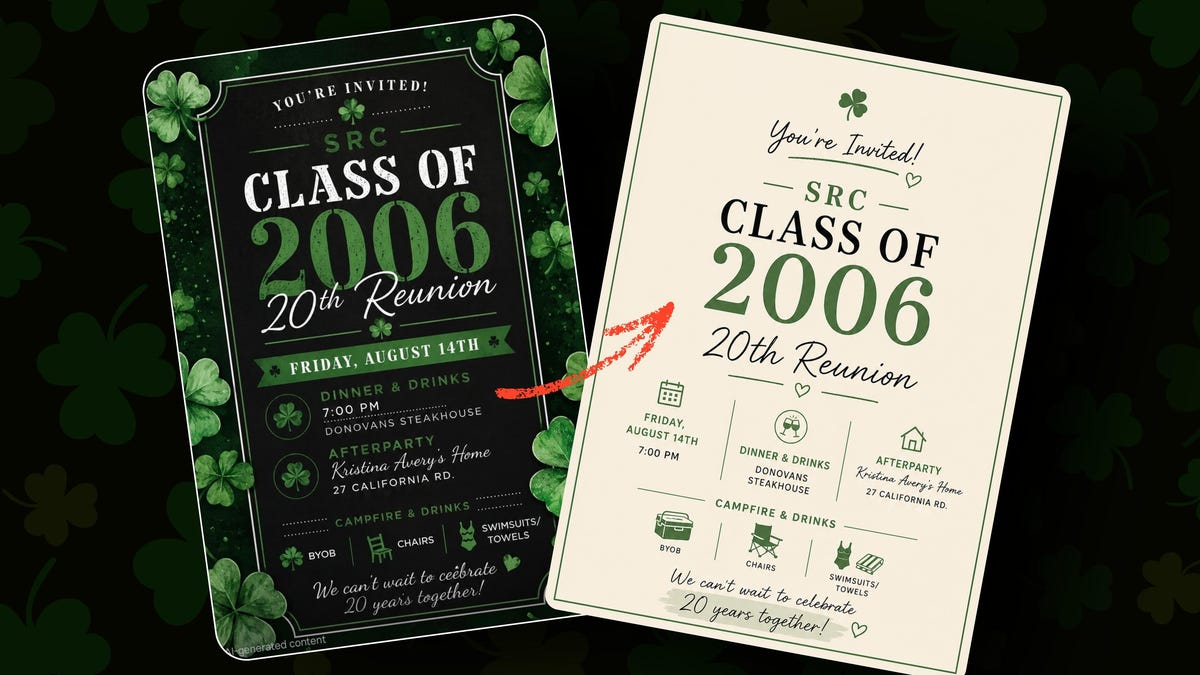
**Creating AI Flyers That Don’t Scream “AI”: Practical Tips for Designers and Non-Designers Alike**
Artificial Intelligence has rapidly changed how we approach creative work, and flyer design is no exception. While some embrace AI-generated visuals, others cringe at the sight of a poorly made event poster overflowing with shamrocks and distorted fonts. The truth is, AI can produce decent flyers quickly and inexpensively—but with some smart guidance, it can do much better.
This article offers actionable tips and prompt strategies for creating cleaner, more professional-looking AI flyers. Whether you’re a small-business owner, a community organizer, or simply planning an event, these suggestions can help you avoid common AI design pitfalls.
—
### **1. Get Feedback from a Graphic Designer**
Before diving into AI tools, consider consulting a graphic designer—even briefly. Professional designers bring an eye for layout, typography, and brand consistency that AI still can’t fully replicate. If hiring a designer isn’t feasible, ask a design-savvy friend to review your concept over coffee.
*Also see:* **[Adobe Express vs Canva: Which design tool is better?](link)**
—
### **2. Decide the Flyer’s Core Message**
A great flyer communicates its purpose within seconds. Define a clear, concise message—such as “This flyer invites alumni to a 20-year high school reunion on July 12 at Riverside Park.” Use this message to guide your headline, visuals, and call to action.
*Also see:* **[How to design killer Small Business Saturday ads for free with AI](link)**
—
### **3. Use a Reference Design for Inspiration**
You don’t need to copy a design—just draw inspiration from it. Find a flyer you like, upload it to ChatGPT or Gemini, and ask it to analyze the layout, color palette, typography, and hierarchy. Then, ask the AI to create something original using those same principles.
*Tip:* Avoid asking the AI to “copy this style exactly,” as that can raise copyright issues. Always use art you’re allowed to reference.
—
### **4. Specify Format and Limit Design Elements**
Will your flyer be printed on 8.5″×11″ paper? Shared as a vertical Facebook image? Decide the format and set clear constraints:
– One focal point
– One or two typefaces maximum
– Consistent line spacing
– Limited color palette (2–3 colors)
– Generous margins and white space
Too many elements make a flyer feel cluttered and unprofessional.
*Also see:* **[My 3 favorite AI tools for voice dictation while vibe coding](link)**
—
### **5. Tell the AI Not to Look AI-Generated**
In your prompt, explicitly request a clean, minimal design. Mention specific things to avoid:
– Glowing text or fake 3D effects
– Overuse of icons or ornamental borders
– Distorted objects or random gradients
– Fancy script for critical details
Instead, ask for flat colors, crisp typography, and restrained styling.
*Also see:* **[Claude’s Record-a-Skill cut my research from hours to 30 minutes](link)**
—
### **6. Supply Original Images and Copy**
AI-generated images often look “off.” To avoid this:
– Use your own photos (e.g., event venue, team pictures)
– Pull logos from the school or organization’s official files
– Store images with clear filenames (e.g., `school_logo.png`) and reference them in your prompt
Similarly, always provide your own text—including date, time, location, and wording—and instruct the AI to reproduce it exactly.
*Also see:* **[I tested ChatGPT Plus vs. Gemini Pro](link)**
—
### **7. Generate Art and Text Separately**
For best results, let AI create the background or visual concept first, then add text later using a layout editor like:
– Canva
– Adobe Express
– Figma
– Affinity Publisher
This keeps text editable and sharp, and prevents the AI from corrupting wording during generation.
*Also see:* **[You can use 70+ Adobe tools without leaving ChatGPT](link)**
—
### **8. Prompt Strategically and Iterate**
Follow a structured prompt format:
**Background/scene → Subject → Key details → Constraints**
Expect multiple iterations. Refine one element at a time—such as increasing whitespace or simplifying the color scheme—and ask for a new version each time.
*Also see:* **[I tested ChatGPT Images 2.0 vs. Gemini Nano](link)**
Finally, have a second person review the design. Fresh eyes can catch readability issues or inconsistencies you might miss.
—
## **FAQ**
**Q: Can I really create professional flyers using AI?**
Yes—especially with clear prompts, reference designs, and human oversight. AI is a powerful tool, but it works best when guided.
**Q: How do I avoid copyright issues when using AI?**
Avoid asking the AI to replicate protected designs or trademarked logos. Use public domain images or your own assets, and always review platform terms of service.
**Q: What if I don’t have access to a graphic designer?**
Use peer feedback, online design communities, or affordable freelance platforms like Fiverr. Even a one-time consultation can improve your results significantly.
**Q: Why does my AI flyer look too busy?**
This is often due to overcrowding—too many icons, fonts, or colors. Simplify the design, increase whitespace, and focus on one core message.
**Q: Can I edit text after AI generates a flyer?**
Yes. For editable text, generate the visual separately and add typography in tools like Canva or Adobe Express.
—
## **Conclusion**
AI flyer design has come a long way—but it still benefits from human intention. By setting a clear message, using thoughtful prompts, supplying original content, and applying basic design principles, you can produce AI-generated flyers that look polished and professional.
Remember: the goal isn’t to eliminate designers, but to work smarter. With a little planning and iteration, you can create eye-catching flyers that communicate effectively—without screaming “AI made this.”
